


TL;DR
To install VMware tools Ubuntu, you can follow these steps:
- Update and upgrade your system by running
:andsudo apt updatesudo apt upgrade. - Install Open VM Tools by executing:
sudo apt install open-vm-toolsin the Terminal. - Verify VMware Tools status and functionality: After installation, reboot your virtual machine. Then, run
vmware-toolbox-cmd -vto confirm the installation.
Explore the guide below to learn the step-by-step instructions to VMware tools install Ubuntu and common errors that can occur during the installation.
Is your Ubuntu virtual machine not performing as well as you’d like? Installing VMware Tools can make a big difference by enhancing graphics, improving mouse and keyboard integration, and boosting network performance. In this post, I’ll guide you through the installation process step by step and help you avoid common errors. You’ll learn what VMware Tools is, how to install VMware tools Ubuntu, and how to troubleshoot issues. By the end, your virtual machine will run smoother and more efficiently. Let’s dive in and enhance your VM experience!
What is VMware Tools?
VMware Tools is a set of utilities and drivers that enhance the performance and usability of virtual machines running on VMware software. When you install VMware Tools on a virtual machine, it includes:
Drivers: These help your virtual machine’s operating system understand and communicate better with the virtual hardware.
Utilities: These offer features like better mouse handling, time synchronization, and improved graphics performance.
Why Install VMware Tools Ubuntu?
Here are four main benefits of installing VMware tools on Ubuntu:
- Enhanced Graphics and Display Features: VMware Tools improves the graphics performance of your Ubuntu virtual machine. It allows you to adjust the screen resolution dynamically and use multiple monitors more efficiently. This makes your display look better and more responsive.
- Improved Mouse and Keyboard Integration: Without VMware Tools, you might notice some lag or choppiness when using your mouse and keyboard. VMware Tools smooths out this interaction, making it feel like you are working on a regular physical machine. You can seamlessly move your mouse between the host and the virtual machine without having to click to release the cursor.
- Seamless File Sharing Between Host and Guest: VMware Tools makes it easy to share files between your host machine (the computer running VMware) and your Ubuntu virtual machine. You can set up shared folders, drag and drop files, and copy and paste text between the host and guest systems. This simplifies tasks that require moving data back and forth between the two environments.
- Enhanced Network Performance: With VMware Tools, your Ubuntu virtual machine gets better network performance. It includes optimized network drivers that improve the speed and reliability of your internet and network connections within the virtual machine. This means faster file transfers, better online performance, and a smoother experience when using network resources.
How to Install VMware Tools on Ubuntu
To install VMware Tools on Ubuntu, first, open your terminal and update your package list with sudo apt update. Next, install the Open VM Tools package by running sudo apt install open-vm-tools open-vm-tools-desktop. After the installation, reboot your system with sudo reboot. This process ensures that VMware Tools are properly installed, enhancing your virtual machine’s performance and usability.
That was the quick answer. Here are the detailed steps to install VMware on Ubuntu:
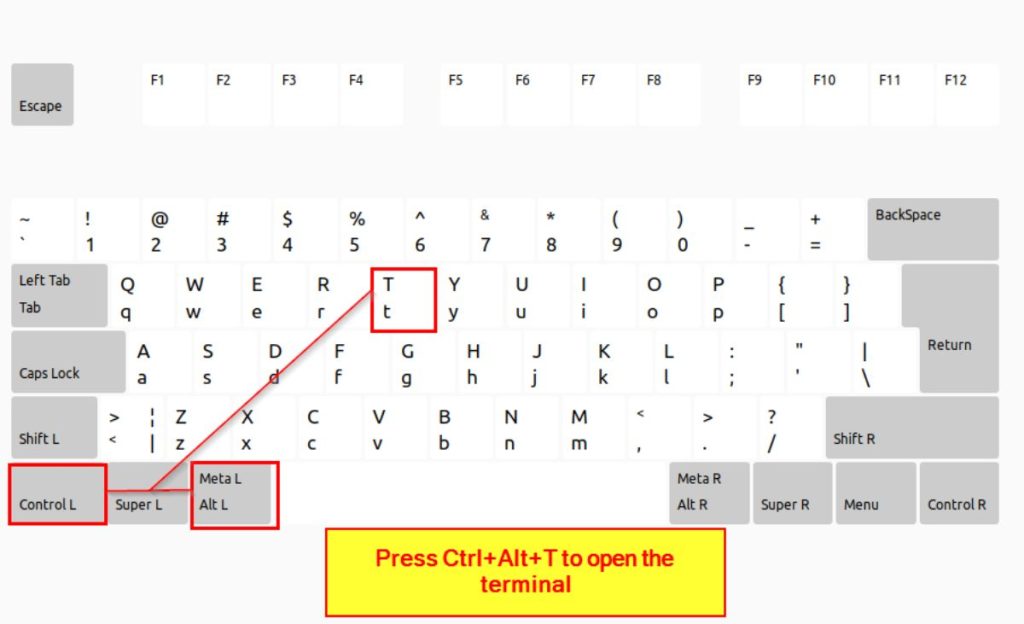
- Open your Terminal window.
- Update the package lists and metadata from the repositories by running:
sudo apt updateThis command fetches the latest information about available packages and their versions from the configured repositories.

- Upgrade the installed packages to their latest available versions by executing:
sudo apt upgradeThis command installs the latest updates and security patches for the installed packages on your system.

- Ubuntu install open-vm-tools by executing the following command in the Terminal:
sudo apt install open-vm-tools- After the installation is complete, reboot your virtual machine to ensure that all components are loaded correctly.

- Run the following command to verify the status of VMware Tools in your Ubuntu virtual machine:
vmware-toolbox-cmd -vThe command will show the VMware tools version.

5 Common Errors When Installing VMware Tools on Ubuntu
Installing VMware tools on Ubuntu is a simple process, but encountering errors is not uncommon. Avoiding these common errors will help you optimize your virtual machine’s performance and unlock the full benefits of VMware Tools. Here are five common errors that you may encounter:
- ❗️ VMware Tools Not Found: This error occurs when the VMware Tools ISO file is missing or the VM’s CD/DVD drive isn’t connected. Ensure the ISO is mounted correctly and accessible. Check your VMware hypervisor settings to confirm the ISO is presented to the VM.
- ⚠️ Outdated Linux Kernel: Incompatibility issues with an outdated kernel can cause VMware Tools installation to fail. Keep Ubuntu updated with the latest kernel using
sudo apt updateandsudo apt upgrade. Verify supported kernel versions with the VMware compatibility matrix. - 💾 Insufficient Disk Space: Lack of disk space can stop VMware Tools installation. Ensure there’s enough free space by removing unnecessary files or expanding the virtual disk. Check space with
df -hbefore starting the installation. - 🔄 Dependency Issues: Dependency conflicts can occur during installation. Use package managers like
aptordpkgto identify and resolve these conflicts. Check dependencies and versions withapt-cache policy package-name. - ❌ Incompatible VMware Tools Version: Using an incompatible version of VMware Tools can cause errors. Match the VMware version with your VMware hypervisor version for compatibility. Refer to VMware documentation for correct version information. Avoid generic VMware Tools from open-source repositories.
Ubuntu Install VMware Tools: Summing Up
In this article, I’ve covered step-by-step method to install VMware Tools on Ubuntu. I also covered common errors and troubleshooting tips. With these guides, you’ll enhance your virtual machine’s performance and usability.
To expand your knowledge further, I recommend reading more about:
- Creating desktop shortcuts on Ubuntu to streamline your workflow and access applications quickly.
- Clear the apt cache in Linux to free up disk space and resolve package issues.
- Fix the “You Have Held Broken Packages” error to ensure smooth software installation and updates.


![How to Remove APT Repository in Ubuntu [4 Best Methods] featured image](https://linuxier.com/wp-content/uploads/2023/08/How-to-Remove-APT-Repository-in-Ubuntu-4-Best-Methods-featured-image-380x250.jpg)
