


TL;DR
To install Gnome Disks Utility on Ubuntu, you can follow these steps:
- Run
sudo apt updateto ensure access to the latest package information from software repositories. - Use
sudo apt install gnome-disk-utilityto install the utility, enabling disk management tasks on Ubuntu
Read the guide below to learn the step-by-step method to install GNOME Disks utility on Ubuntu and how to configure it. Also, learn the common errors that can occur during the process and their troubleshooting tips.
GNOME Disks is a powerful utility that plays a crucial role in managing disk drives efficiently on Ubuntu systems. Whether you want to partition drives, create disk images, monitor disk health, or perform benchmark tests, GNOME Disks has got you covered. Say goodbye to cumbersome command-line tasks and embrace a visually intuitive interface that empowers you to manage your storage with ease. In this comprehensive guide, we’ll walk you through every aspect of installing, navigating, and utilizing the GNOME Disks utility to its fullest potential on your Ubuntu machine.
Gnome Disk Utility Install: Reasons to Install It
Installing the GNOME Disk Utility on your Linux system can offer several practical benefits, making it a valuable tool for managing storage devices efficiently. Here’s why you might consider installing this utility:
- Easy Disk Management: GNOME Disk Utility provides a user-friendly graphical interface that simplifies disk drive management. It eliminates the need for complex command-line commands for common tasks such as formatting, partitioning, and mounting drives, making it accessible even to new users of Linux. If you want to learn how to list mounted disks, read this detailed guide.
- Comprehensive Disk Health Monitoring: The utility includes support for reading SMART (Self-Monitoring, Analysis, and Reporting Technology) data from disks. This feature helps in monitoring the health and performance of your hard drives, providing warnings for potential failures before they occur. This proactive monitoring can save time and prevent data loss.
- Partitioning Made Simple: With GNOME Disk Utility, you can easily create, delete, or resize partitions without needing to use more complicated tools like
fdiskorparted. It supports various file systems, allowing users to format partitions to their needs directly through its interface. - Backup and Restore Functionality: The ability to create and restore disk images is another significant advantage. You can use GNOME Disks to make full backups of your disk partitions, which can then be restored to the same or a new disk. This is especially useful when upgrading hardware or recovering from data corruption.
- Encryption Support: GNOME Disks provides an intuitive way to manage encrypted disks. It supports creating encrypted partitions with LUKS, which adds a layer of security to your data, protecting it from unauthorized access.
- Mount Management: It allows for easy management of mount points and mounting options. You can configure disks to auto-mount at startup, adjust mount options for optimal performance or security settings, and handle mounted devices without delving into configuration files.
How to Install GNOME Disks Utility on Ubuntu
1. APT Package Manager
APT (Advanced Package Tool) is the default package manager for Ubuntu and other Debian-based distributions. It’s used to install, update, and remove software from the command line. This method is ideal for users who prefer a quick and efficient way to manage software via the Terminal. Follow these steps:
- Press Ctrl + Alt + T to open a Terminal window on your Ubuntu system.

- Type the following command and hit Enter to update the package list:
sudo apt update- This command updates the list of available packages from the software repositories, ensuring that you have access to the latest package information.

- Type the following command and hit Enter to install GNOME Disks:
sudo apt install gnome-disk-utility- This command will install GNOME Disks Utility package, allowing you to access and use the utility for disk management tasks on your Ubuntu system.

2. Ubuntu Software Center
The Ubuntu Software Center is a graphical interface that allows you to install, remove, and manage software applications provided by Ubuntu’s repositories and third-party sources. It’s suitable for users who prefer a graphical interface over command-line operations.
- Launch the Ubuntu Software Center. Click on the Show Applications icon at the bottom left of your screen.

- Type Ubuntu Software, and click on its icon.

- In the Ubuntu Software Center, use the search bar at the top, type GNOME Disks, and press Enter. Click on the GNOME Disks utility from the search results.

- Then click the Install button. You may be prompted to enter your password to authorize the installation.

3. Synaptic Package Manager
Synaptic Package Manager is a powerful graphical package management tool for apt. It provides more detailed options for managing packages and is a great tool for users who require more control over software installations without using the command line.
- If Synaptic is not already installed on your system, you can install it via the Terminal:
sudo apt install synaptic
- Find and launch Synaptic from your application menu or by typing synaptic in the Terminal (you might need to enter your password).

- Click on the Search button in the Synaptic window, enter gnome-disk-utility in the search box, and press Enter.

- Right-click on the gnome-disk-utility package in the search results, and select Mark for Installation.

- Click the Apply button in the toolbar to begin the installation. Confirm the changes if prompted.

How to Configure GNOME Disk Utility on Ubuntu
Configuring GNOME Disk utility Ubuntu empowers users to harness the full potential of their disk management tasks with ease. By mastering the configuration options of GNOME Disks, you can fine-tune your Ubuntu system’s storage management to suit your specific needs and ensure optimal disk health and performance.
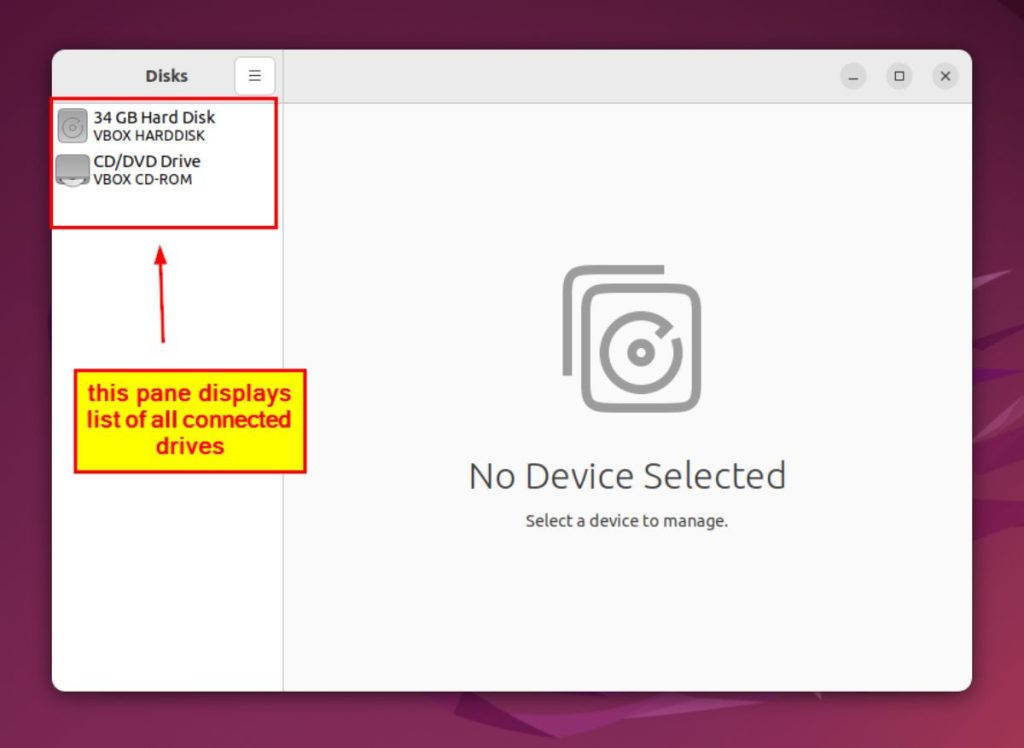
1. How to Identify Connected Drives and Partitions
To identify the drives and partitions connected to your system:
- Open the GNOME Disks application from the Applications menu.

- In the Devices pane, all connected drives and their respective partitions will be listed.
2. Viewing Drive Details and SMART Data
GNOME Disks allows you to view detailed information about your drives and access SMART data for monitoring drive health:
- Click on the drive you want to examine in the Devices pane. The Volumes pane will display information about the selected drive, including model, capacity, and usage.

3. Managing Drive Properties and Settings
GNOME Disks enables you to manage drive properties and settings, such as changing the mount options, labels, and formatting partitions:
- Click on the partition you wish to manage in the Volumes pane.

- Use the gear icon to access options for formatting, editing mount options, and setting partition flags.

4. Conducting Disk Read/Write Benchmark Tests
To benchmark your disks with GNOME Disks:
- Launch GNOME Disks from the Applications menu. Choose the drive you want to benchmark. Click on the disk option icon, and then click on Benchmark Disk.

- Click on the Start Benchmark button.

- Now set the values for the benchmark test as per your requirements.

- Enter the password then click on the authenticate button to start the benchmarking process.

- The output will be:

5. Improving Disk Performance with TRIM and Other Techniques
For SSDs, enabling TRIM is essential to maintain optimal performance:
- TRIM should be automatically enabled for most modern Linux systems and SSDs. To verify, run the following command in the Terminal:
sudo systemctl status fstrim.timer- After execution, the command will show the status.

Common Errors When Installing and Using GNOME Disks Utility
GNOME Disks is a powerful disk management utility for Ubuntu users. However, like any software, you can encounter some common errors when you install GNOME Disk utility and during its usage. Here are five common errors with possible solutions:
- 🛠️ Installation Dependency Issues: Sometimes, during installation, GNOME Disks may encounter dependency errors, leading to a failed installation. This typically happens when required packages are missing or not up-to-date. To resolve this, ensure your system is updated with the latest package information using
sudo apt update, and then attempt to install GNOME Disks again. - 🔄 Missing Drive Detection: One common issue users face is GNOME Disks failing to detect connected drives or partitions. This could be due to driver conflicts or system-related errors. To troubleshoot, try reconnecting the drive or restarting your system. If the issue persists, check if the drive is detected in the system’s Disk Utility or use Terminal commands like lsblk or fdisk to confirm its visibility.
- 💽 Unable to Format Partitions: Users may encounter difficulties formatting partitions using GNOME Disks. This issue could arise due to insufficient permissions or a corrupted filesystem. To resolve this, ensure you have administrative privileges by using
sudowhen accessing GNOME Disks. If formatting still fails, try formatting the partition using a different filesystem type or utilize the command-line toolmkfs. - 🔌 Drive Not Mounting: In some cases, users may find that drives are not mounting correctly through GNOME Disks. This can be caused by incorrect mount options or filesystem errors. To address this, manually mount the drive using the Terminal and check for any filesystem inconsistencies using tools like
fsck. Also, ensure that the mount point exists and is accessible. - 🚫 Missing SMART Data: GNOME Disks relies on SMART data to monitor drive health. However, some drives may not provide SMART data, leading to its absence in the application. To check if SMART is enabled, use the Terminal command
sudo systemctl status smartd. If your drive doesn’t support SMART, consider using alternative disk monitoring tools.
Summing Up the Gnome Disks Install Process
In this post, I’ve given you step-by-step methods to install GNOME Disk Utility using APT, the Ubuntu Software Center, and Synaptic Package Manager. I’ve also covered how to configure it, identify connected drives, view SMART data, and troubleshoot common errors you might encounter.
If you want to learn more, consider reading about:
- Installing GNOME on Ubuntu, which will give you a broader understanding of the GNOME environment and additional tools you can use.
- Formatting disk partitions in Linux, a crucial skill for managing and organizing your storage devices effectively.
- Listing USB devices in Linux, to help you troubleshoot and manage connected peripherals with ease.
Frequently Asked Questions
Is it possible to access remote disks with GNOME Disks?
Does GNOME Disks support RAID configurations?
mdadm on the command line. To manage existing RAID arrays, you can use GNOME Disks to perform tasks such as adding or removing disks, examining array properties, and identifying potential issues. For more complex RAID setups or creating RAID arrays from individual disks, the command-line approach with mdadm provides greater flexibility and control.


